
PLDT routers, by default, use the IP address of 192.168.1.1. If a PLDT router is to be integrated into an existing LAN network that uses a different subnet, then, we need to change the IP address of PLDT routers.
PLDT routers provide two accounts for logging into the web admin page for setting the router’s configuration. One of the two accounts, the “admin” account, will not allow you to change the router’s IP address. The second account, the “adminpldt” account, is the real administrative account that gives you the power to change every router option, including changing the IP address of the router.
The problem with the “adminpldt” account is that it is disabled by default. Before you can use the account, you need to first log in using a Super Admin account to switch on or enable the “adminpldt” account. After that, you can log in as “adminpldt”.
In short, to be able to change the IP address of PLDT routers, you need to know several key information. First, what is the Super Admin account username and what is its password. Second, what is the password for the account “adminpldt”. And third, you need to know the IP address of the web admin interface. PLDT does not freely share this information in order to keep people from breaking their routers through mis-configuration. As a matter of fact, they have changed the passwords several times in the past.
Here are the key information that we need:
1 2 3 4 5 | PLDT Router Web Interface IP Address: https://192.168.1.1/fh SuperAdmin Username: f~i!b@e#r$h%o^m*esuperadmin SuperAdmin Password: s(f)u_h+g|u Admin Username: adminpldt Admin Password: z6dUABtl270qRxt7a2uGTiw |
Step by step guide on how to change the IP address of PLDT routers.
Step 1
Open an internet browser. Type the address “https://192.168.1.1/fh” on the address bar and press the “enter key”.
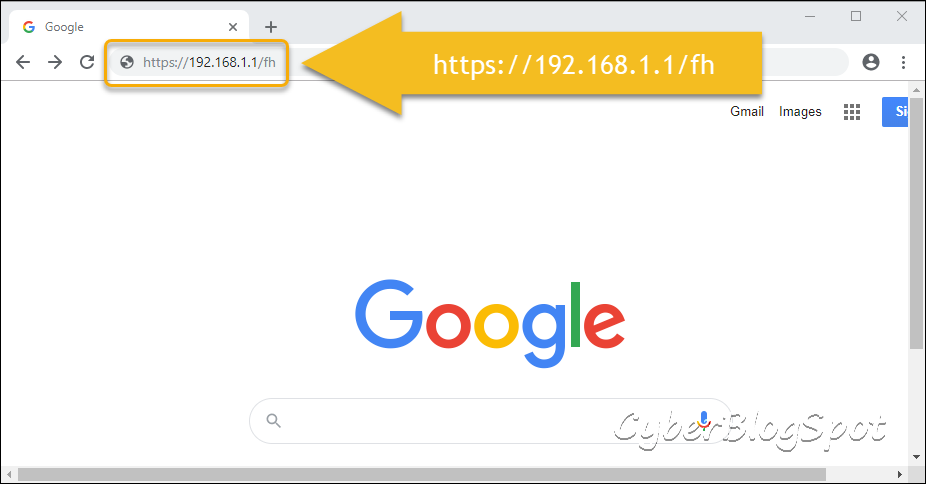
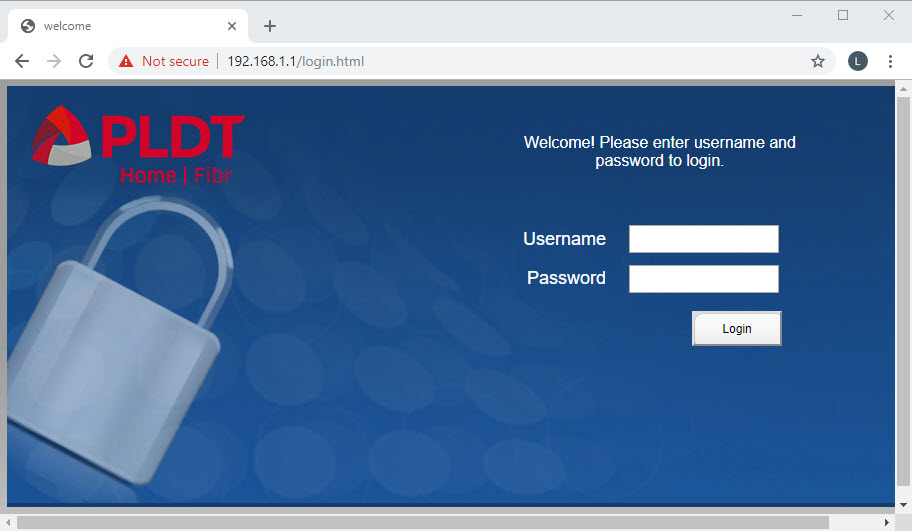
Notice that the browser is redirected to “192.168.1.1/login.html” as shown in the browser’s address bar.
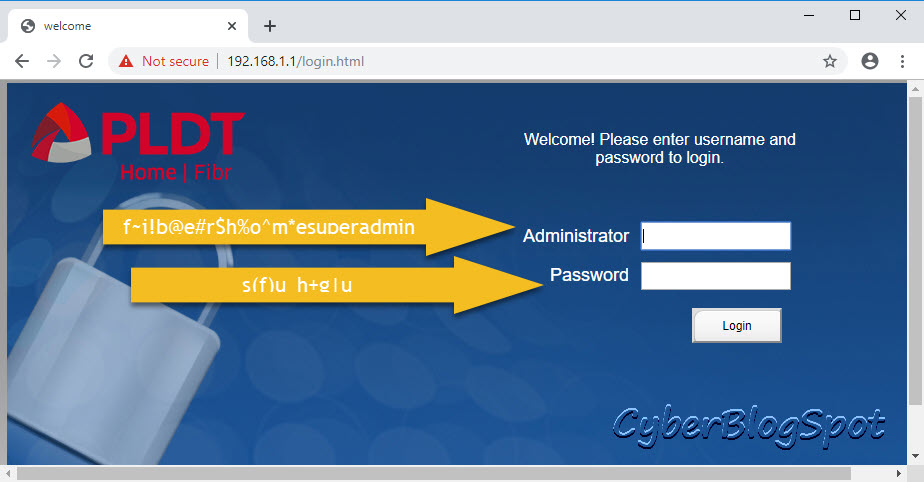
Step 2
Log into the web admin interface using the Super Admin account. Owing to the fact that typing in both the username and the password is prone to errors, it is a good idea to simply copy and paste both of them.
1 2 | Username: f~i!b@e#r$h%o^m*esuperadmin Password: s(f)u_h+g|u |
PLDT Super Admin Trivia: Previously, the Super Admin username was “fiberhomesuperadmin” and the password was “sfuhgu”. The password was easy to remember as it is the acronym for the types of fiber optics routers, namely, Single Family Unit and Home Gateway Unit. They later made the username and password gibberish by inserting shifted keys sequentially, starting from the left-topmost key of the keyboard.
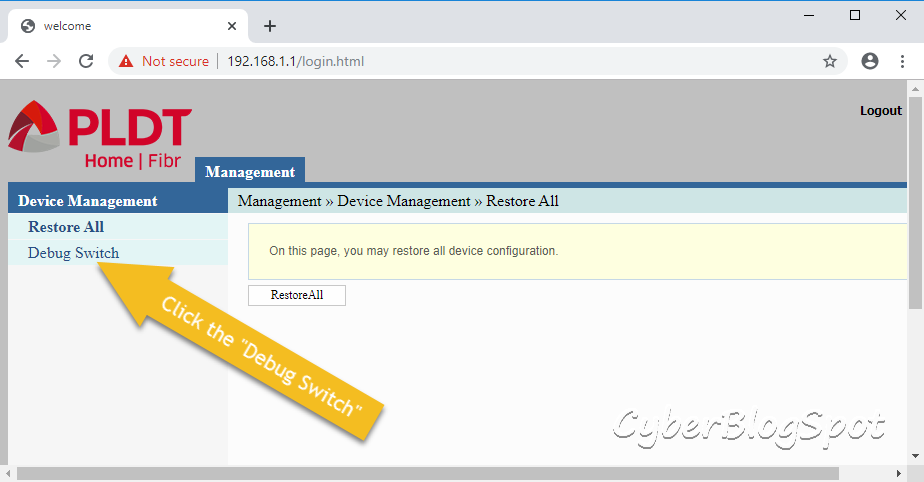
Step 3
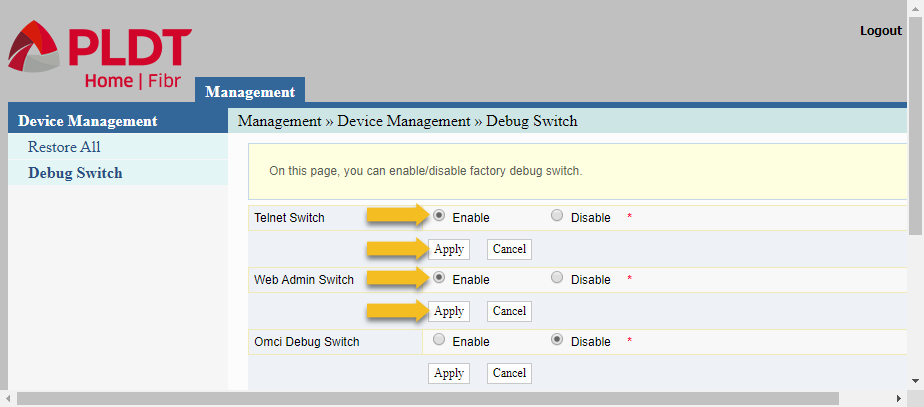
Click on the “Debug Switch” option under the “Device Management” Menu.
Step 4
Enable the “Web Admin Switch” by clicking the “Enable” button. Then click the “Apply” button under it.
You may also want turn on the “Telnet Switch”. This will come handy later on if we need to use Telnet to recover a previously set “adminpldt” password. To enable the “Telnet Switch”, do the same procedure used in enabling the “Web Admin Switch”. Click the “Enable” button, and then, click the “Apply” button under it.
Finally, click the “Logout” near the top right corner of the window.
Step 5
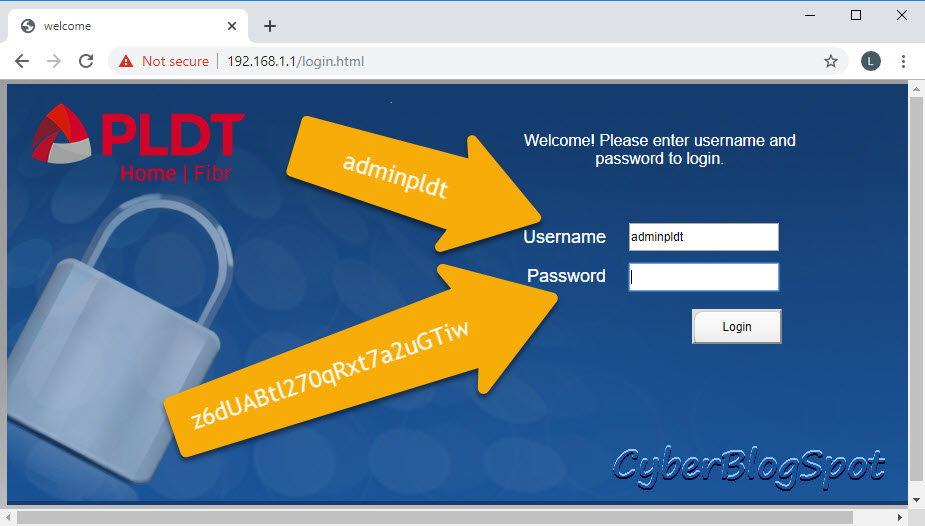
Log in using the “adminpldt” account. If you opened a new internet browser window, make sure to type the correct web admin URL: https://192.168.1.1/fh.
1 2 | Username: adminpldt Password: z6dUABtl270qRxt7a2uGTiw |
Possible problems to be encountered
After clicking the “Login” button, an unsuccessful login will result in either one of the two error messages.
1 | Admin account Unavailable! |
1 | Username or Password Error! |
The first error message, “Admin account Unavailable!”, means that the “Web Admin Switch” in Step 4 was not properly enabled and applied. You must repeat the process from Step 1 to Step 4. Make sure to click the “Apply” button after selecting the “Enable” button.
The second error message, “Username or Password Error!, may be caused by the following:
- Wrong URL: make sure you type in the browser’s address bar the complete web admin URL, https://192.168.1.1/fh and not 192.168.1.1 only.
- Mistyped username and/or password. Check the entered username and password. Do a copy and paste instead of manually typing in the long default password.
- The router’s password for the “adminpldt” account has been previously set to a new value. The default password only works if the router has not been previously configured. The router requires anyone initially logging in using the default password to immediately replace the password for the “adminpldt” account. Therefore, if someone has previously configured the router, the “adminpldt” account password is already different from its default value.
Solution A: Do a hardware reset or reset the router to its default factory configuration.
Solution B: Hack or recover the currently set password using the Telnet command. - The same error message may appear if PLDT replaced the “adminpldt” password again. This may be solved by Solution B above. If PLDT also replaced the Super Admin username and/or password, there are sufficient information on the net on how to hack it. It may be hacked by tearing down the router and connecting a computer to its serial port.
Step 6
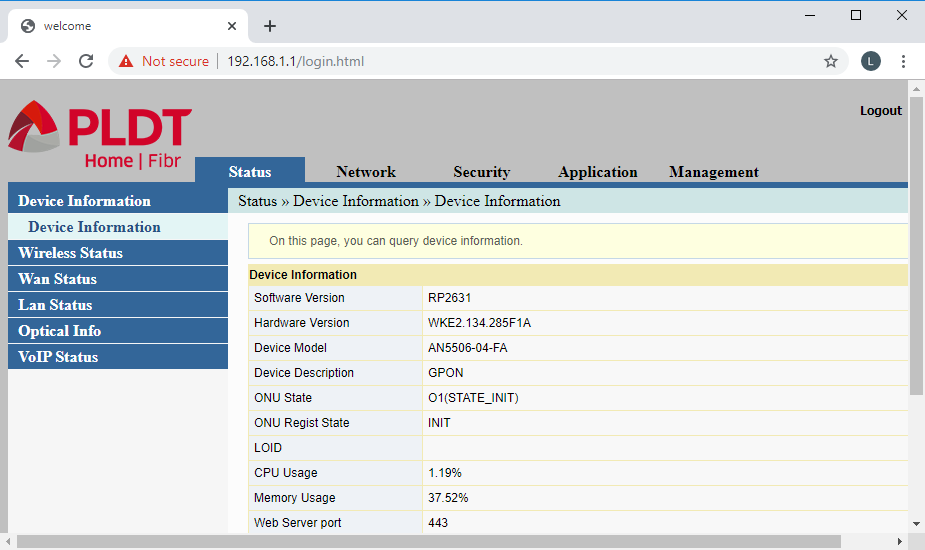
Below is a screenshot of the router’s configuration main menu after a successful login using the “adminpldt” account.
Select the “Network” item on the Main Menu of the web interface. On the left sidebar, click on the “LAN Settings” item. Under the “LAN Setup” is the “LAN Interface” which refers to the IP address of the router. You may now change the IP address of the router.
Warning: Remember or write down the IP address that you typed on the LAN interface textbox. After rebooting the router, you will need the IP address you typed here to access the router’s configuration web page again. If you forget the IP address, you might end up doing a hardware reset of the router.
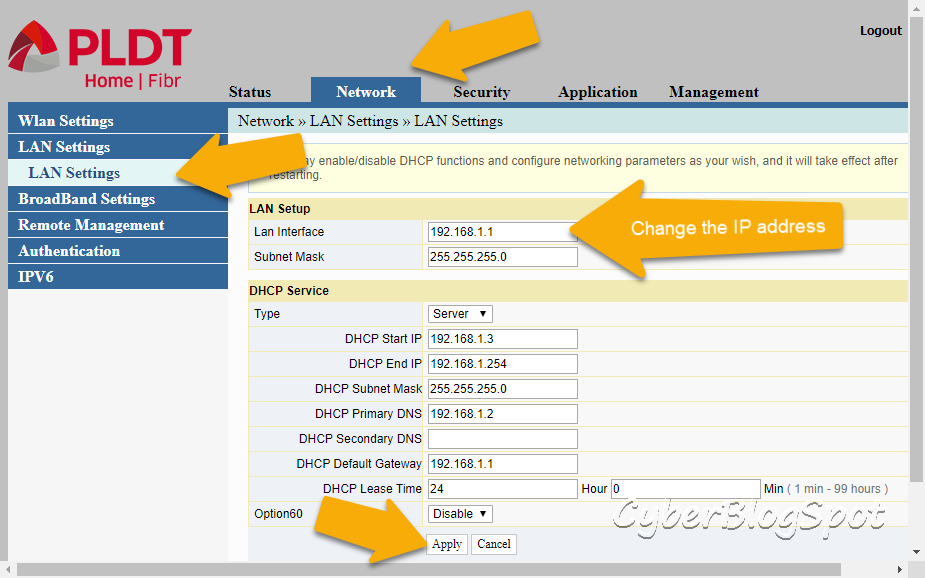
Click the “Apply” button at the bottom of the screen. A message will appear with the text: “Please reboot to apply!”.
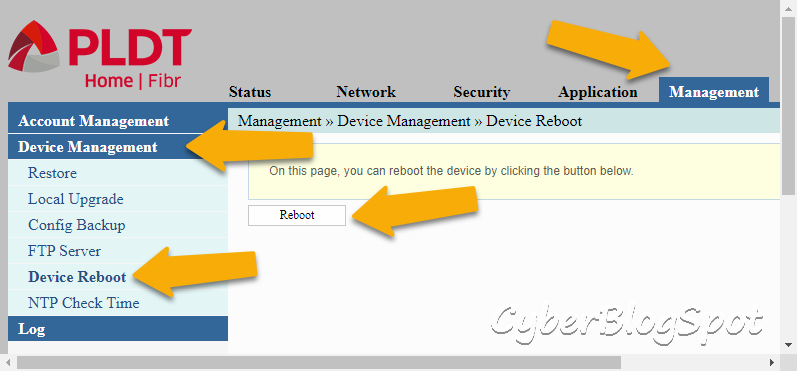
To reboot the router, click the “Management” item on the Main Menu. Then select “Device Management” on the sidebar. Next, click the “Device Reboot” on the sidebar. Finally, click the “Reboot” button.
Related Video on How to Change the IP Address of PLDT Routers
YouTube video entitled Default Username and Password of PLDT Routers
Related Articles on How to Change the IP Address of PLDT Routers
How to Configure a PLDT Router
Configure a PLDT router using the admin account named “adminpldt” to get a full and complete access to all of the router’s configuration options.
How to Configure a PLDT Router with Admin Account
Configure a PLDT router using the user account “admin”. This account can only configure the wireless networks (WiFi).
Default Username and Password of PLDT Routers 2019
The latest update on the list of default username and password of PLDT routers.
Default Password of PLDT Routers 2019 Compilation
An updated list of default password of PLDT routers including old, archived passwords used for a period of time in the past.
Default Password of PLDT Router AN5506-04
Default password for PLDT router model AN5506-04 but information included here may apply to other PLDT router models.
Enable Admin Account on PLDT Fibr Router AN5506-04
The admin account on PLDT routers are disabled by default. To make configuration changes to router, the admin account needs to be enabled first.
How to Reset PLDT Router to Defaults
Perform a hardware reset or reset your PLDT router to its original, default factory configuration.
How to Change the Wifi Names of PLDT Routers
The default wireless LAN names or WIFI names of PLDT routers are quite long. And so are their default passwords, making it cumbersome to type in.
References on How to Change the IP Address of PLDT Routers
PLDT Home Fibr – The different PLDT Home Fibr subscriptions which may be using the subject router, PLDT Home Fibr Model AN-5506-04.
IP Address on Wikipedia – Information about network IP addresses.
Working perfectly on my 50 mbps pldt fiber connection. I passed many calls to customer services but they could not assist me. Then I finally got the superadmin by following your blog post. Nice job boss
Thanks for taking time to leave a comment. It’s great to know the blog helped you out. Enjoy!!!
does anyone know the super admin account in Huawei HG8145V.
Greetings,
Just want to ask if anyone here know how to change the Log-in Screen (PLDT Fibr/HOME?
Im just thinking if i can put a personalized LOG-IN design…
Thanks
Awesome!!!
finally got the super admin
many thanks sir!
Godbless!
Is it only me? but the https://192.168.1.1/hf is not working on me. how? please help me
@Justine…..https://192.168.1.1/fh not hf……….
sir i cant log in this Username: f~i!b@e#r$h%o^m*esuperadmin
Password: s(f)u_h+g|u
Username and Password Error
ill already reset the router also same problem please help me reply..
When i enter administrator and password it doesnt work.
This credential is already outdated, won’t work on the current ONUs
Hello, may I just ask. What IP address should I use? My primary router is PLDT Fibr and my secondary router, which will be used as an extension router is also PLDT Home Fibr. If somebody can answer me, please send me an email ahdonis21@gmail.com. it seems like I am in an impasse. Your help will be much appreciated.
How to configure my pldt hOme fibr routeR ar secondary router as wifi repeater/extender